With a free 30 day trial, you can experience all the features of Swiftlight and see first hand how it can help you. Click here to register for your free 30 day trial.
Once you have Swiftlight installed, building your first plan is quick and easy. We would suggest that if you have not already watched the overview video then this would be a good place to start. The following four steps will then get you going and give you a good ”big picture“ view of your plan:
When you open Swiftlight and create a new file, you start in the Timeline view. Type in your project name in the space already highlighted for you.

Next, in the boxes where it says “Click here to add text”, click and then type to add bullet points outlining the Objectives, Deliverables and Success Metrics, of your project. Note: defining and getting agreement to specific objectives, deliverables and measures for success is an important driver of successful projects, and the top section of the Timeline is intended to help you capture and communicate this information.
When you first create a file, the Timeline view shows an 8 week date range starting from the current week. You can set the date range that you want for your project in two ways:
1) Use the shortcut buttons on the blue Timeline label row to either remove or add weeks to the date range;

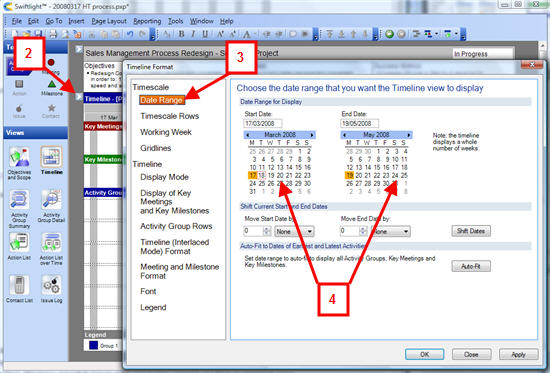
Or 2) Open the formatting dialogue by clicking on the white arrow icon (2), selecting the date range tab (3), and directly selecting the start and end dates (4).
Next, drag and drop Meetings, Milestones and Activity Groups from the toolbox (5) to the relevant sections of the page (6). Add text to give each of them the appropriate name, and drag and drop them to the right position on the page. (Note: the length of Activity Groups can be changed by grabbing the ends of the arrows and dragging them to the required length, or by using the right click menu to set specific dates).
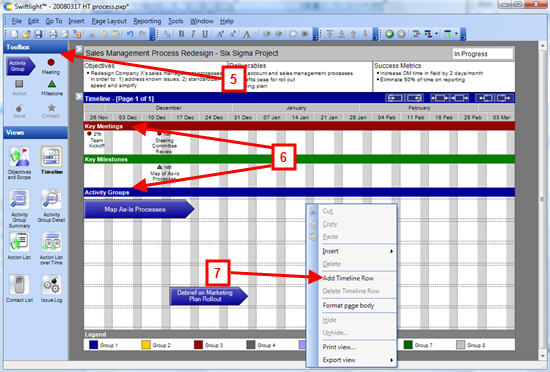
If you decide you need more (or fewer) rows for Activity Groups than the six that are there as the default, then you can use the right click menu (7) to add or delete Timeline rows. Alternatively, you can use the formatting dialogue (2 – see graphic under step two) and use the Activity Group Rows tab to set the desired number of rows.
Note: if Swiftlight detects that items would overlap on the timeline, it automatically reformats to prevent overlaps and at the same time try to keep the content on one page, thereby saving you from spending time and energy on basic formatting. For example: When you position a meeting, milestone or Activity Group in a way that overlaps with another one, Swiftlight will insert a new row and shrink row heights to try to keep all the contents on one page.
Now you can step back, look at your plan and tidy it up. Making changes such as adding more time to the date range, adding or moving activities, or colouring Activity Groups differently is fast and easy. And when you do make changes, Swiftlight will, if needed, automatically reformat the timeline to try to keep things on one page – so you don’t have to worry about wasting time and energy on reformatting to accommodate your changes!
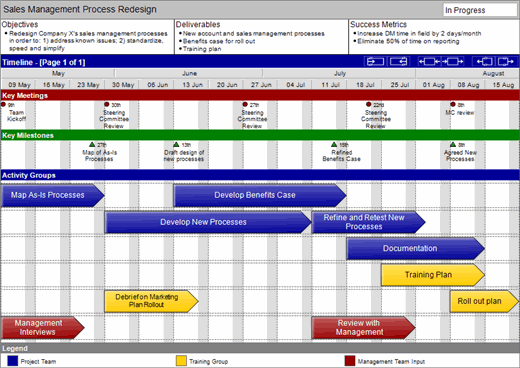
With these four simple steps, you and Swiftlight have created a good “big picture” view of your plan in a clear, presentation-ready format. And it should have been both quick and easy!
From here, you can print it out, export it to MS PowerPoint or PDF, or send it to someone for their review. When you are ready, you can go on to develop a more detailed plan using the Timeline and Swiftlight’s other views. For example, for each Activity Group you can define deliverables, add tasks and assign responsibilities so that you can get to grips with the nitty-gritty of “who needs to do what by when” – the specific actions that will drive your project forward.
At each step, with its outstanding ease of use, presentation-ready outputs and focus on the fundamentals, Swiftlight makes your life easier. Why not get a free 30 day trial of Swiftlight so that you can see for yourself?