Simpler, more visual and easier than MS Project, and faster and more structured than planning in Excel or PowerPoint, Swiftlight helps you to get organised, communicate clearly and save time in the process.
This page provides an overview video, an introduction to the user interface and, further down the page, screenshots of many of Swiftlight’s views and commentary on when they can best be used.
“Creating and tracking a project is exceptionally easy because the interface is simple and clean.” – PCWorld Review
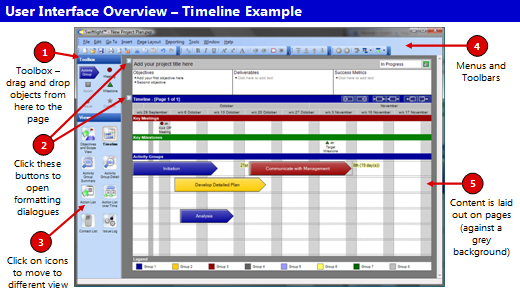
Swiftlight’s user interface is very easy to get around. It has a clearly defined working area or “page”, data entry by “click and type” or “drag and drop”, and a range of familiar features.
When you first open Swiftlight, you start at the Timeline view, an example of which, with a little data added, is shown below:
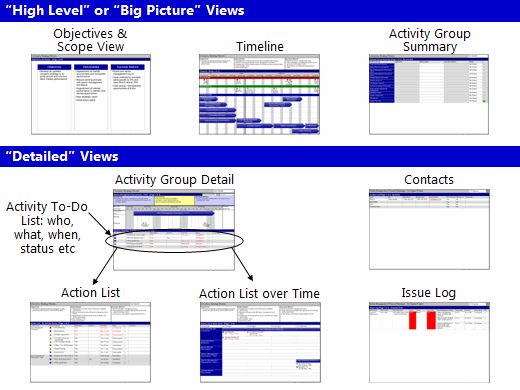
Swiftlight’s 8 different views have been designed to provide:
Don’t get lost in the detail! Swiftlight gives you views for high level planning and separate views for the detail. You can choose to use one, some or all of the views as suits the needs of your project and your working style.
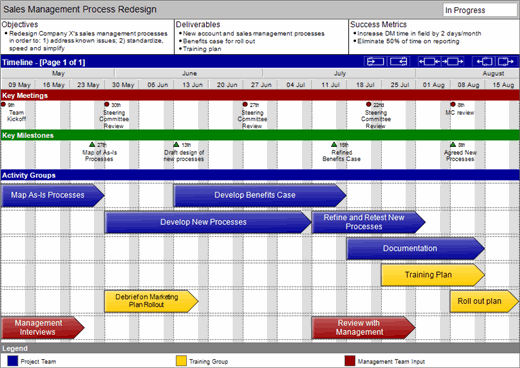
The Timeline is an intuitive and highly configurable view that provides a “big picture” perspective of the plan. With a number of display options and simple formatting controls, the timeline helps you to visualize and communicate your plan clearly, quickly and easily.
When to use it:
Example 1: A 3 month timeline showing project goals and high level meetings and milestones
Example 2: A 3 year timeline for a product launch focusing on key milestones and key activities.

Example 3: A 15 week timeline for a three phase process and systems improvement project – with activity percent complete and status.
In addition to the examples shown above, the Timeline View has other display options including a “Review Mode” which shows the current plan timing vs a baseline.
The Activity Group Detail focuses on what is happening, or needs to happen, for a particular activity. It provides a section for activity objectives and deliverables (and other information categories), a mini-timeline highlighting meetings and milestones, and a to-do list (who, what, when, status etc).
When to use it:
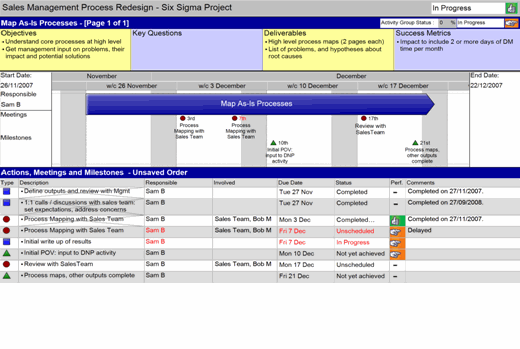
Note: completed items are crossed out, and overdue items highlighted in red.
The Action List over Time is a time based view of Activity Groups and their “to-do lists”. It is great for reviewing and updating “what needs to get done in the next few weeks”, and can be arranged by Activity Group or by Person.
When to use it:
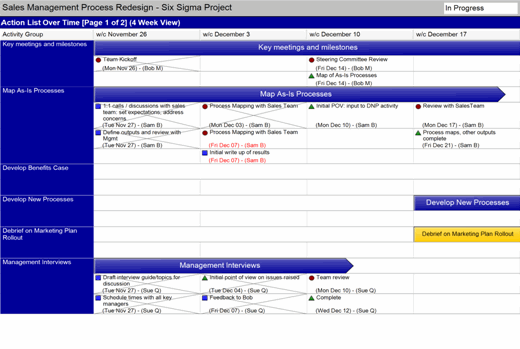
Note 1: completed items are crossed out, and overdue items highlighted in red.
Note 2: Some people like working in the Action List over Time, others prefer the Activity Group Detail. What is best for you will depend on your project and your working style – Swiftlight gives you the flexibility to choose.
Swiftlight’s other views (Objectives and Scope, Activity Group Summary, Action List, Issue Log and Contacts) each provide a different perspective on your project and powerful outputs to help with planning, management and communication. To explore Swiftlight in more depth and experience first hand how it can help you, why not get a free 30 day trial.
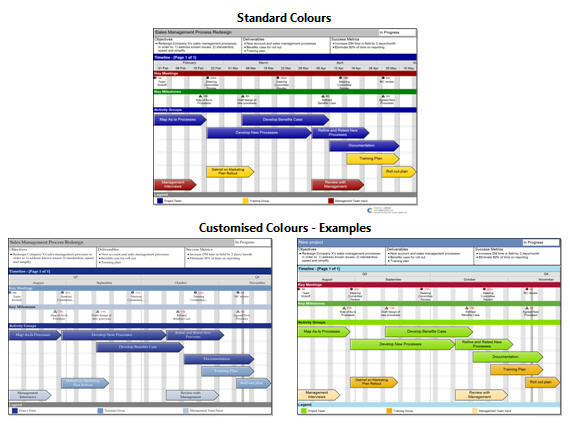
Swiftlight makes your life easier at all stages of a project, with its different views supporting you at each step and facilitating the communication that is critical to success.
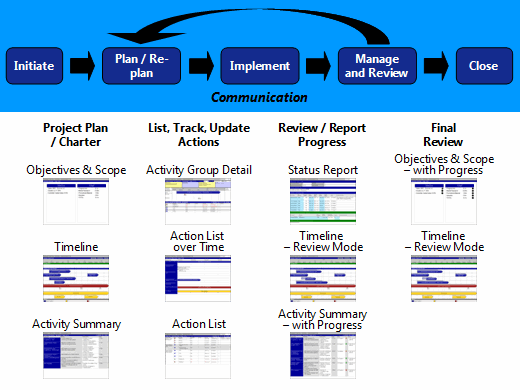
Note: the graphic above illustrates just one way that Swiftlight can be used – you don’t have to use it this way. Swiftlight’s flexible design means that you can use one, some or all of views as suits your needs and working style.
Overall, with its outstanding ease of use, presentation-ready outputs and focus on fundamentals, Swiftlight saves you time, creates clarity for you and others, and helps you to drive your projects forward. Why not get a free 30 day trial so that you can see for yourself?